Replace encrypted table data
Cases for replacing encrypted table data include the following:
- Change encryption key information (encryption key).
- Stop encrypting data and storing it in databases.
This section describes how to replace existing encrypted data with new encrypted data. The example used is a table containing the following encrypted data:
Important
This should be done during a time when no data is being added, modified, or deleted from the target table.
Change encryption key information (encryption key)
Rotation of encryption keys is one way to avoid security risks, for example by refreshing the encryption key information currently in use.
However, a new encryption key requires replacing the existing encrypted data with the new encrypted data. The following steps are described here as a method of replacement.
- Create a new encryption key file and add new encryption key information.
- Decrypt existing encrypted data and encrypt with new encryption key information.
- Exporting data encrypted with step 2.
- Duplicate the existing table and import the data created in step 3.
- Delete an existing table and rename the newly created table to the name of the deleted existing table.
- Replace the encryption key file located at the location of the existing encryption key information with the file created in step 1, and delete the encryption key information created in step 1.
Add encryption key information
- To freshen up the encryption key information, first create a new encryption key file. See Creat encryption key for detailed instructions.
Hint
- If you have created an existing encryption key file using the default creation method (create encryption key file with random password), you can create a different encryption key file by creating the key file again using the default creation.
- If you have created an existing encryption key file with an arbitrary password, you can create a different encryption key file by setting a different password than the previous one.
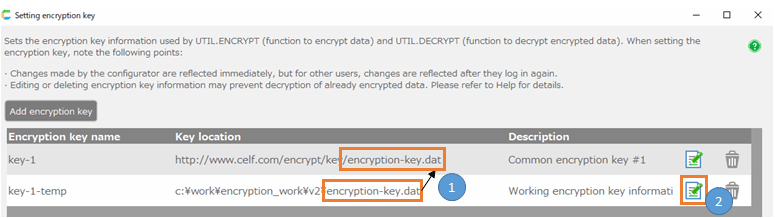
- Add encryption key information. See Register encryption key information for detailed instructions on how to add encryption keys.
Hint
- Here, the 'Encryption key name' and 'Key location' that differ from the existing encryption key information are set.
- Place the encryption key file in a local path as it is only for data replacement.
Decrypt existing encrypted data and encrypt with new encryption key information
Create an application that uses the "Get" action to retrieve all data from a target table and display it on a sheet.
- On the sheet, create rows and columns (area A) that have the same column headers as the columns of the table of the table to be replaced.
- Add rows and columns for retrieving data (area B) and rows and columns for decrypting it (area C) to the sheet, and set the decryption function (UTIL.DECRYPT function) in the cells in area C.
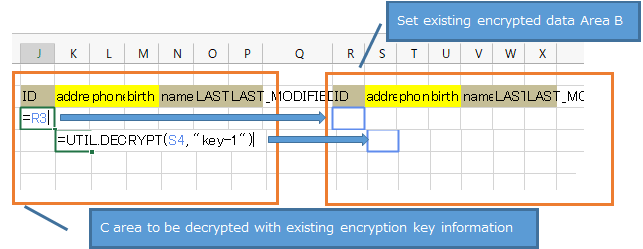
- Create the following Get All action and set it to be set in the B area created in step 2.
- Set the encryption function (UTIL.ENCRYPT function) with the new encryption key name in the A area created in step 1.
- Execute the "Get" action. You will see the data encrypted with the new encryption key information in the A area created in step 1.

Hint
Now let’s check the following:
- The decoding result output to the C area is correct.
- Encrypted data output to the A area must be error-free.
- Encrypted data Encrypted data in area A and area B must be different.
Exporting data with the "CSV Output" action
Use the "CSV Output" action to export the data to be replaced to a CSV file.
- In the "CSV Output" action, specify the output range as follows:
- Execute the "CSV Output" action created in step 1 to export the new encrypted data to a CSV file.
Hint
Open the output CSV file with a text editor, etc., and delete any extra lines.
Create a new table and import new encrypted data
Create a new table and import the output CSV file.
- Select an existing table and create a duplicate table using the "Copy table definition" menu. You can leave the table name as it is.
- Select the duplicate table, click "Import table data" from the right-click menu, and select the exported CSV file to import the data.
- Confirm that data has been imported into the duplicate table.
Replacing a created table
Delete the existing table and replace it with the table from which the new encrypted data was imported. (Make the duplicate table the 'regular'.)
- Rename or delete an existing table.
- Change the name of the duplicate table to the name of the existing table.
Replace encryption key file
Finally, replace the encryption key file. (Make the new encryption key file the 'regular'.)
- Replace the encryption key file located at the location of the existing encryption key information with the new encryption key file.
- Newly created encryption key information (for work) is deleted.
Tip
- If you have set a local file path for the location of the encryption key file, you must distribute a new encryption key file to developers and users.
- If the URL of the web server is set as the location of the encryption key file, developers and users do not need to be notified unless the location is changed.
Related Keywords
cryptography, encryption, decryption, security, security risk, database, function, key, migration, rotation
