Modify "Quotation" sheet
This section explains how to modify the "Quotation" sheet.
Attention
See Modify "Quotation" sheet for instructions on modifying apps created with version 3.6.1 or earlier.
Set up layout
Add more columns to enter temporary values in the workflow action.
Double-click the "Quotation" sheet.
Click the sheet settings icon.
Increase the sheet column number by one to "40". Column V is added to the sheet.
Hide column AN. Select column AN and select Hide from the right-click menu.
Placement of buttons related to workflow
Place buttons related to workflow.
These buttons will be shown and hidden later by an action.
Double-click the "Quotation" sheet.
Add a button to the following position.
When creating a button by copying from an existing button, change the button ID (the second argument of the =BUTTON function) so that it does not overlap in the sheet.
Modify action
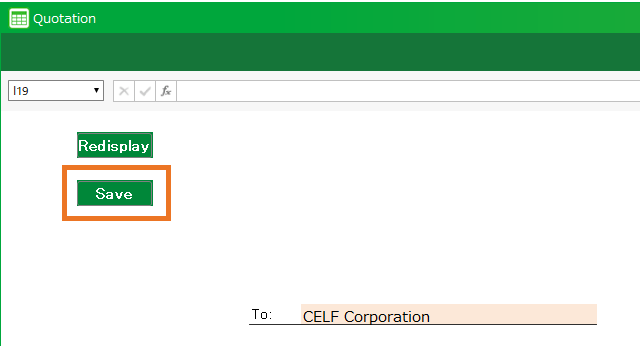
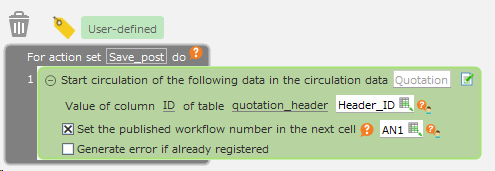
Set Save button (1)
Circulation starts when saved.
- Click the action set setting icon.
- In the dialog that opens, double-click on the "Save_post" action set.
- Drop the "Start circulating the following data in []" action.
- Click the Select Circulation Data button, and select "Quotation".
- Enter "=Header_ID" in the data designation cell.
Hint
The "Header_ID" refers to a predefined cell in the "Name Management" section.
- Check the "Set the issued workflow number to the next cell" checkbox, and select the AN11 cell. This cell will be used for specifying the "Workflow number" in subsequent workflow actions.
Hint
Column AN is the column you added in "Set up sheet layout" above.
Uncheck "Generate error if already registered". 3 to 6 will result in the following actions
Click the "OK" button in the "Action set settings" dialog.
Set Save button (2)
Already circulated data cannot be updated.
- Click on Action Set Settings to open the "Save_pre" action set.
- Drop the action into the "Save-pre" action set as shown below.
For the "If []" action, enter =AND(NOT(ISBLANK(Header_ID)),copy registration<>"true").
This allows you to check the circulation status only when the data is existing.
- For the "Start circulation of the following data in the circulation data []" action after 2, enter the same as in "Set Save button (1)" above.
- For the "Show circulation status for the following circulation data" action after 3, enter the data as shown in the figure.
(The status of the circulated data corresponding to the workflow number in AN1 cell is output to AN2 cell.)
- Next to the action in 4, drop and enter the next three actions from the "Control" tab.
Enter =AND(NOT(ISBLANK(AN2)), AN2<>"New") in "If ~ then" action.
This will make the system to display a message and exit if the circulation status is not "New".

- Click the "OK" button in the "Action set settings" dialog.
Set the Circulate button
This allows you to execute the circulation process (application, approval, etc.).
Click the "Execute Circulation" on top of the sheet.
Click the "New action set" button in the "Action definition" dialog, enter "Execute Circulation" and click "OK" button.
Drop the "Perform circulation for the following circulation data" action and enter the following

Hint
AN1 is the address of the cell where the workflow number was entered.
- Click the "OK" button in the "Action set settings" dialog.
- In the "Select Action Set" dialog, make sure that the "Execute Circulation" line is selected, and click the "Select" button.
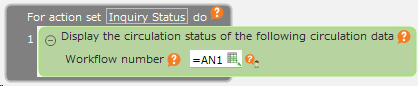
Set the Inquiry Status button
Enable the display of the screen to check the status of the circulation.
Click the "Inquiry Status" button on top of the sheet.
Click the "New action set" button in the "Action definition" dialog, enter "Inquiry Status" and click "OK" button.
Drop the "Show circulation status for the following circulation data" action and enter the following
Hint
AN1 is the address of the cell where the workflow number was entered.
- Click the "OK" button in the "Action set settings" dialog.
- In the "Select Action Set" dialog, make sure that the "Inquiry Status" line is selected and click the "Select" button.
Set History of Circulation button
Enable display of a screen to check the history of the circulation.
Click "History of Circulation" button on top of the sheet.
Click the "New action set" button in the "Action definition" dialog, enter "History of Circulation" and click "OK" button.
Drop the "Display circulation history for the following circulation data" action and enter the following

Hint
AN1 is the address of the cell where the workflow number was entered.
- Click the "OK" button in the "Action set settings" dialog.
- In the "Select action set" dialog, confirm that the "History of Circulation" row is selected, and click the "Select" button.
Set comment button
Enable the display of a screen for referencing and registering comments.
Click the "Comment" button on top of the sheet.
Click the "New action set" button in the "Action definition" dialog, enter "Comment" and click "OK" button.
Drop the "Show comment screen for the following circulation data" action and enter the following

Hint
AN1 is the address of the cell where the workflow number was entered.
- Click the "OK" button in the "Action set settings" dialog.
- In the "Select action set" dialog, confirm that the "Comment" row is selected, and click the "Select" button.
Setting of Initial Display action set
When the screen is initially displayed, show/hide the buttons according to their status.
Click the action set setting icon.
In the dialog that opens, double-click on the "Initial display_pre" action set.
Place the action at the top of the "Initial display_pre" action set as follows
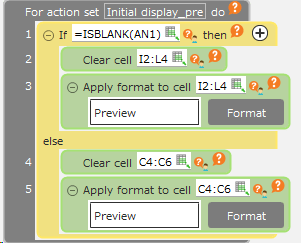
=ISBLANK(AN1) of "If ~ then" action determines whether or not there is a workflow number, and controls the button as follows
- In case there is no workflow number… Clear value of AA13:AD15,、set format to standard
- "Execute circulation" "Inquiry Status" "History of Circulation" "Comment" buttons are hidden.
- In case there is a workflow number…Clear value of U15:U17,、set format to standard
- "Save" button is hidden.
- In case there is no workflow number… Clear value of AA13:AD15,、set format to standard
Click the "OK" button in the "Action set settings" dialog.
Click "OK" button in the "Select action set" dialog.