Exporting and importing CSV files
Register CSV File Data in a Table
- The action settings of the CSV file output are set see "Register the Data of the CSV file in the Table"
Save the table data to a CSV file
- The action settings of the CSV file output are set see "Save Table Data in CSV file"
Display CSV File Data on the Screen
Open the "Action set settings" dialog.
Drag&drop the "Set CSV file data" action in the tab "File operation" at the top left of the action set settings screen to the right side of the screen.
Tip
As shown below, when you drag&drop the action to the left side of the screen, an orange underline appears at the bottom of the action to complete the set.
Set [A1] to the output destination cell of the CSV file.
Hint
This can be specified from the screen by clicking on the icon in the text box.

Specify the source CSV file path for loading.
Hint
- If you select "Specify with popup dialog", you can specify the path in the dialog.
- If you select "Use the specified path", you can specify a fixed path of your choice.
Tip
You can specify the path described in B1 by entering the path in the "B1" cell and typing "=B1" in the "Use the specified path" field.
When you have completed your settings, click the "OK" button at the bottom right of the screen.
Save the data displayed on the screen to a CSV file.
Open the "Action set settings" dialog.
Drag&drop the "Save cell value in CSV file" action from the tab "File operation" at the top left of the Action Set settings screen to the right side of the screen.
Specify the range of data you want to convert to a CSV file.
Hint
You can specify it from the screen by clicking on the icon in the text box. Here the range of "A1:D8" is specified.
Specify the path of the CSV file to be saved.
Hint
- If you select "Specify with popup dialog", you can specify the path in the dialog.
- If you select "Use the specified path", you can specify a fixed path of your choice.
Tip
You can specify the path described in B1 by entering the path in the "B1" cell and typing "=B1" in the "Use the specified path" field.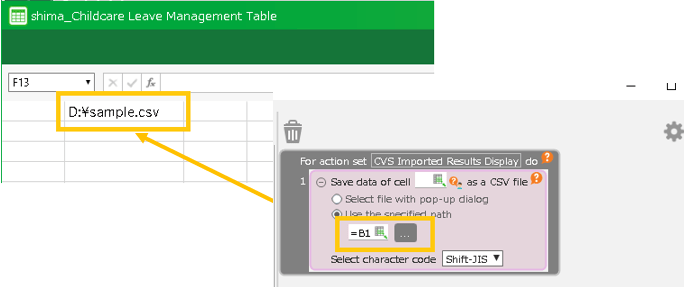
When you have completed your settings, click the "OK" button at the bottom right of the screen.