Process CSV files and output them as another CSV file.
You can use actions to perform various processing on specified CSV files and output it as another CSV file.
The following settings are required for use.
- Set the definition of the input CSV files
- Specify the input CSV files
- Set various conditions for the input CSV files
- Define columns for the output CSV file
- Configure processing settings for output CSV file columns.
- Configure various settings for the output CSV file itself, such as the output path, whether to include a title, etc.
Attention
入力CSVファイルの項目(カラム)数が1000以上の場合は、アクションを実行した時にエラーとなります。
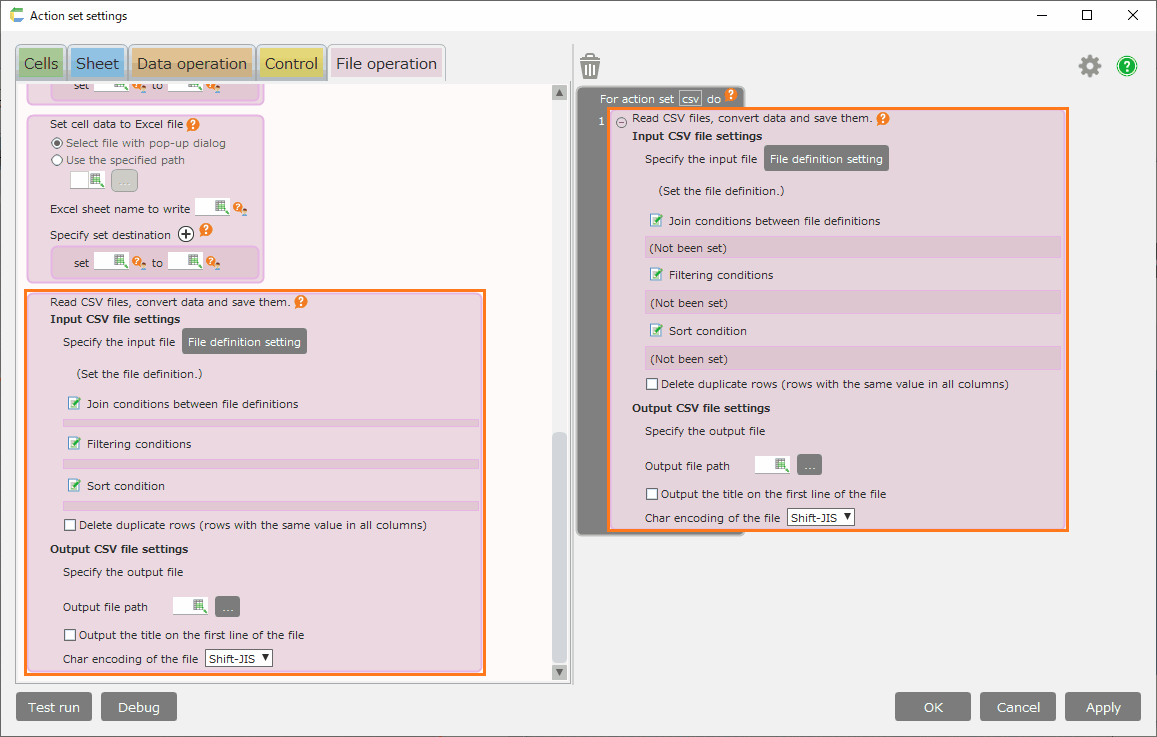
Preparation: Action Settings
First, place the action as shown below.
- Open the 'Action set settings' dialog box.
- Drag the 'Read CSV files, convert data and save them' action from the 'File operation' tab and set it in the edit area.
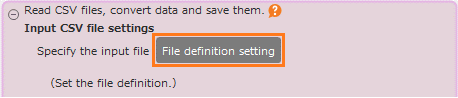
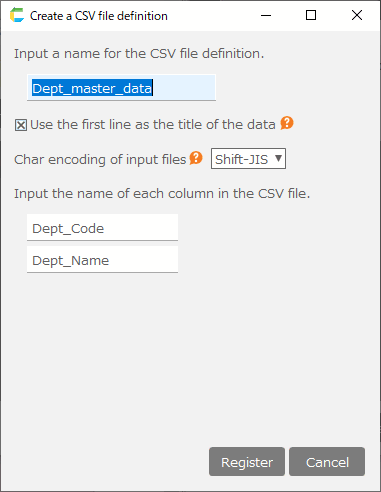
1. Set the definition of the input CSV files.
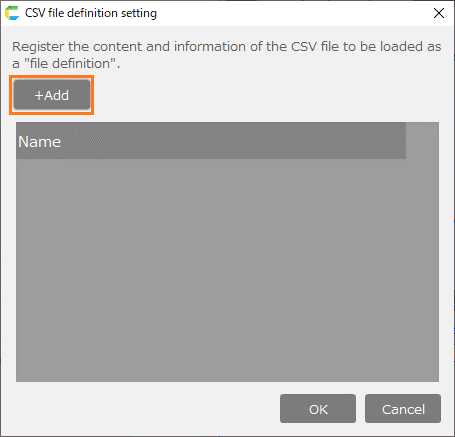
'File definition setting' defines the contents and information of the CSV file to be read.
Specifically, there are the following.
- File definition name
- With/without title line
- Character encoding
- Title of each column
You need to register the file definition for the CSV file to be input.
- Click on the 'File definition setting' button.
- In the 'CSV file definition setting' dialog, Click on the '+Add' button.
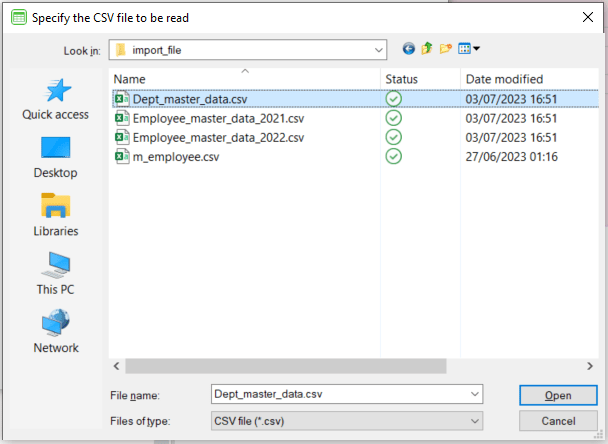
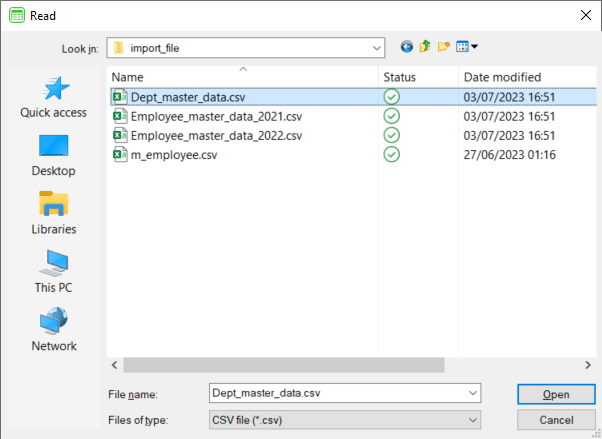
- In the file selection dialog, select the CSV file.
Attention
The maximum file size that can be loaded at one time is 200MB.
- The file definition will be automatically generated from the contents of the selected CSV file.
- Check the definition and modify it if necessary.
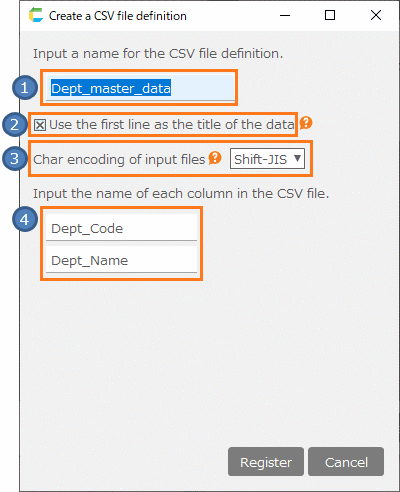
- [1] Name for the CSV file definition
The name of the file definition. By default, the CSV file name is set.
Attention
- Name with only numbers cannot be specified.
- It is not allowed to use the following symbols.
- Half-width space
- Half-width symbols: ! " # % & ' ( ) * + , - . / : ; < = > ? @ [ ] ^ ` { | } ~
- [2] Include/Exclude title
Uncheck this box if you want to handle CSV files with no title.
Tip
It is checked by default.
- [3] Character encoding
The character encoding of the input file.
Tip
In the 'Char encoding of input files' section, you can select one of the following options
- Shift-JIS
- UTF-8
- EUC-JP
- [4] Column Definition
Defines a column in a CSV file.
Tip
By default, the value retrieved from the first line of the CSV file data is displayed.
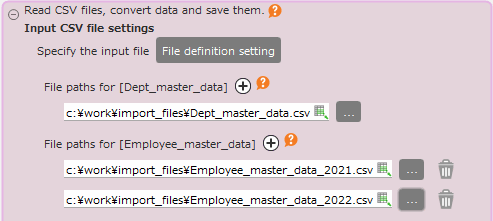
2. Specify the input CSV file.
Specify the path of the CSV file to be input.
- Click on the 'Select File' button.
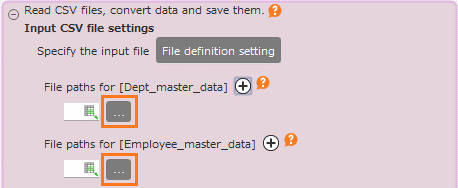
- In the file selection dialog, select a CSV file of the same format as the file definition you have set.
Tip
You can also set the path of the CSV file to a cell, and set that cell to 'Output file path'.
- For each file definition, specify as many CSV files as you need.
Tip
Click '+' to increase the number of input fields for each file definition.
3. Set various conditions for the input CSV file
If necessary, set various conditions for how to handle the data read from the input CSV file.

- [1] Join Conditions
Conditions for joining files, each of which is regarded as a table.
See also
For details on how to specify join conditions, please refer to section 6 and beyond Display Combined Multiple Tables Data > Specify the join condition from the join condition section
Attention
Cannot be set if there is only one file definition.
- [2] Filtering conditions
Conditions to filter the output target among the input CSV file data.
See also
For more information on how to specify filtering conditions, please refer to Get One Table Data > Set search condition
- [3] Sort conditions
Conditions for sorting the input CSV file data.
See also
For details on how to specify the sort conditions, please refer to Get Multiple Data From Table > Set sort condition
Tip
When multiple file definitions are specified, the table created by the join conditions is treated as a single table.
- [4] Delete duplicate lines
- Check this box if you want to delete rows where all the data is the same.
4. Define columns for the output CSV file
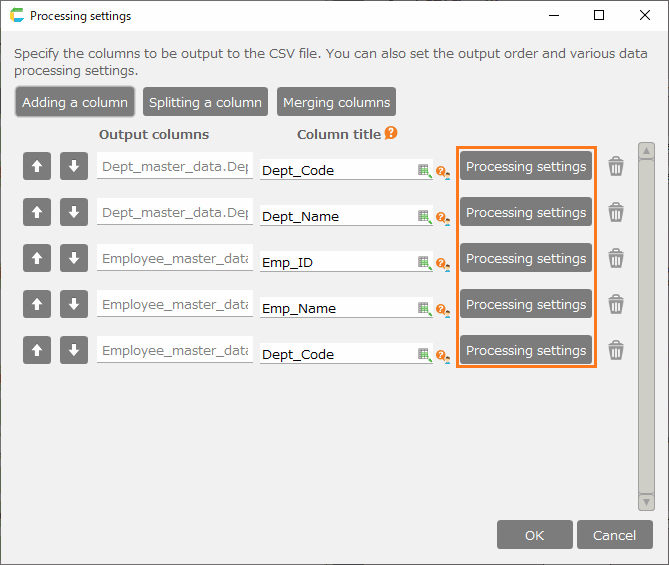
Check the columns of the output CSV file generated based on the file definition, and edit them to the format you want to output.
- Click on the 'Data processing setting' button to open the 'Processing settings' dialog.
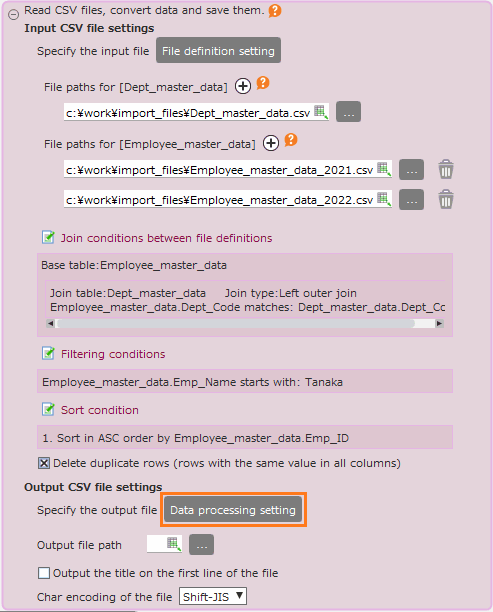
- Check the settings and make the following settings if necessary.
By default, all columns of the input files definitions are set as the output columns.
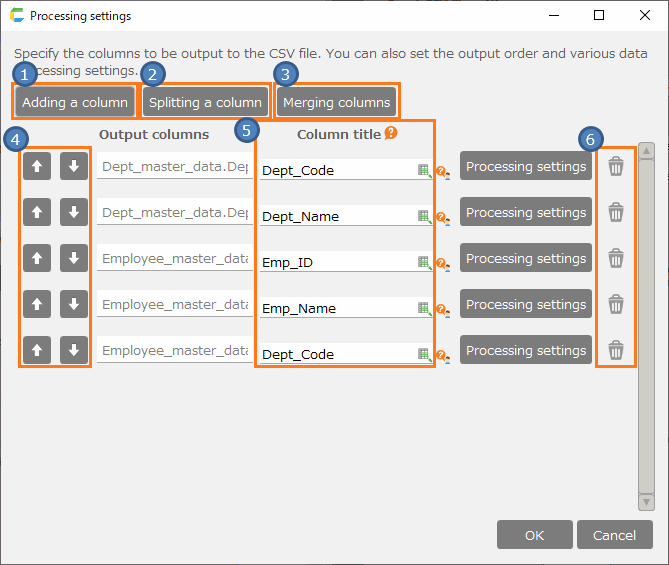
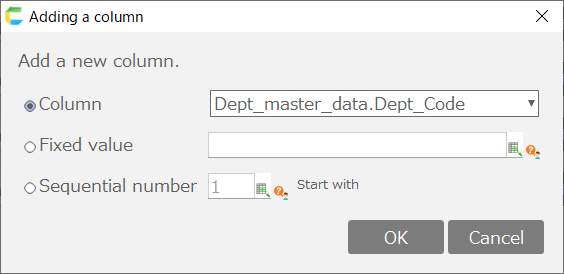
- [1] Adding a column
Select one of the Column, Fixed value, or Sequential number of file definition, and add it as an output column.
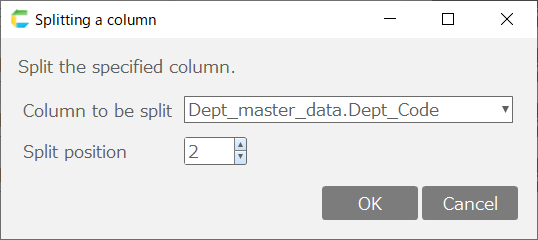
[2] Splitting a column
Split a column at any position and set it as two output columns.
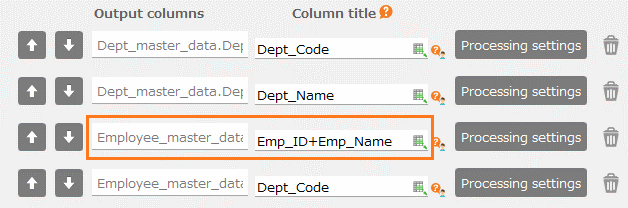
The output column after the setting is displayed as shown below.

[3] Merging columns
You can select multiple columns and merge them.
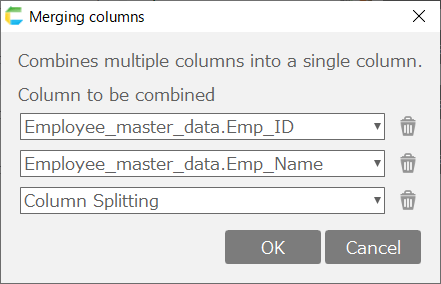
The output column after the setting is displayed as shown below. The columns to be combined will be deleted as they are merged into the combined column.
Tip
If you want to output the columns before merging separately, please add them using 'Adding a Column'.
- [4] Reorder column
- Click '↓' or '↑' to move the target column.
- [5] Column title
This is the title that will be output on the first line of the output CSV when outputting with the 'include title'('Use the first line as the title of the data' being checked) setting.
Tip
By default, the column name set in the file definition is displayed.
- [6] Delete a column
- Click on the trash icon to delete the target column.
5. Configure processing settings for output CSV file columns.
- Click on the 'Data processing setting' button to open the 'Processing settings' dialog.
- Click on the 'Processing' tab to configure the settings. The basic operations are as follows.
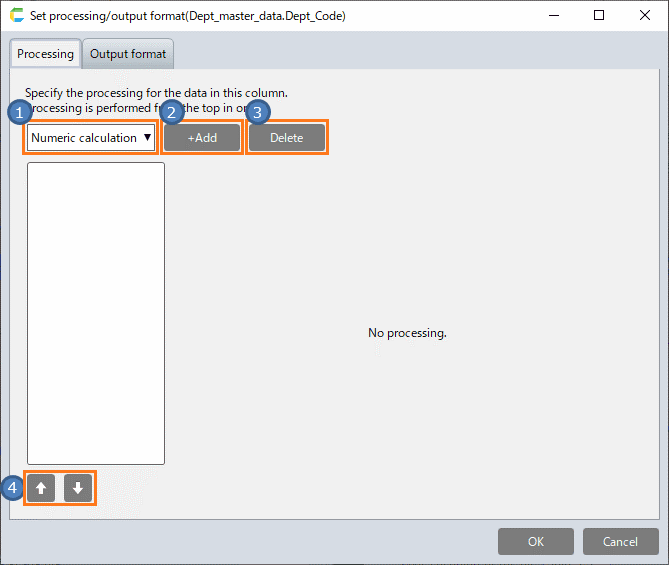
- [1] Select Processing
- Select the processing method to add from the pull-down menu.
- [2] Add processing
- The processing method selected in [1] will be added to the end of the processing list at the bottom.
- [3] Delete processing
- Delete the processing selected in the processing list.
- [4] Change processing position
- Change the position of the selected processing in the processing list.
- Please refer to the following pages for details of each processing operation.
- Configure the output format in the 'Output format' tab.
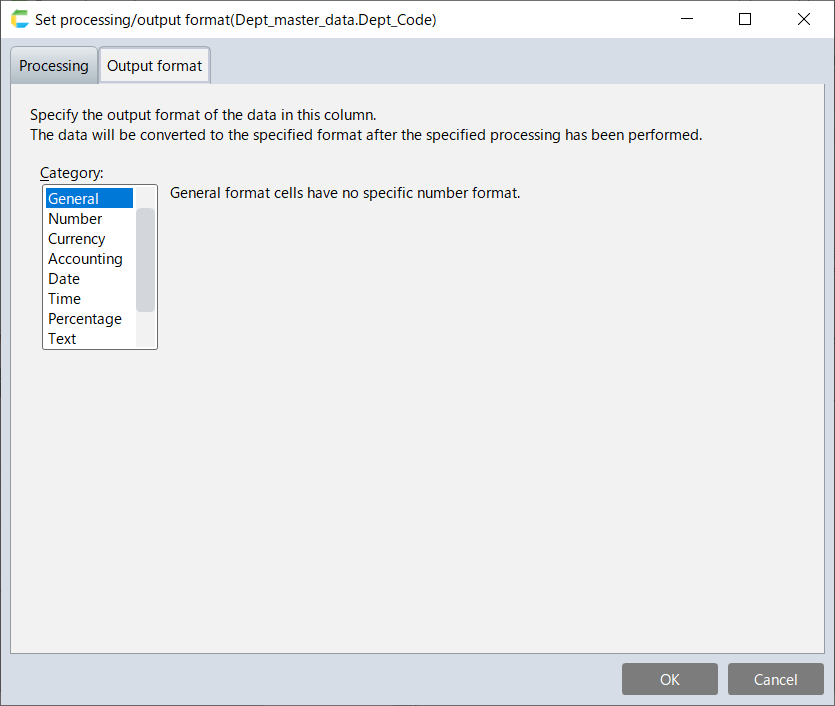
See also
For details on how to specify the output format, please refer to SheetCreate > Change Format Cells > Number
In the referenced page, please read 'cell' as 'CSV output data'.
6. Configure various settings (output path, title, etc.) for the output CSV file itself.
- Configure the various settings for the output CSV file as shown below.
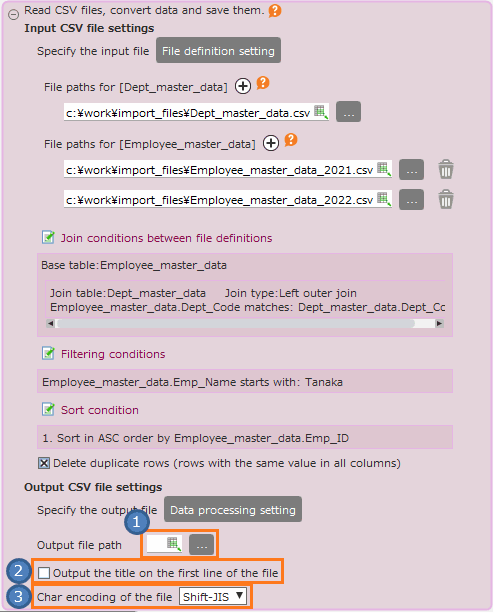
- [1] Specify output file path
Specify the file path of the output destination.
Tip
You can also set the path of the CSV file to a cell, and set that cell to 'Output file path'.
- [2] Output or do not output title
Check this box if you want to output the title.
Tip
If the title output is enabled, the title set in 4. 2. [5] will be output.
- [3] Character encoding
The character encoding of the output CSV file.
Tip
In the 'Char encoding of the file' section, you can select one of the following options.
- Shift-JIS
- UTF-8
- EUC-JP
Related keywords
input, output, format, comma, separate, separator, delimiter, character encoding