Improve App Usability
You can create a basic app by configuring various column settings, master settings, and related table settings. This section explains features that can further improve the usability of your app.
- Adding Free-form Labels
- Grouping Columns and Labels
- Changing Display of Columns, Labels, and Groups Based on Conditions
Adding Free-form Labels
You can place free-form labels on edit and reference screens to display instructions for data entry, terms and conditions, and other information. Since labels are written in HTML, you can flexibly specify text size, borders, alignment, lists, links, and more.
- Click the "Add label" button on the customization screen.
- Select where to insert the label and click the "OK" button.
- Click the "Label setting" button for the added label.

- Write the label to display in HTML and click the "OK" button.
Tip
- Refer to the balloon help in the label editing dialog for the HTML elements that can be included.
Grouping Columns and Labels
You can group and display multiple columns and free-form labels. Groups can have display labels and can be configured to initially display as expanded or collapsed. By grouping related input fields together, you can transform your app into one that is easier for users to understand.
- Click the "Add Group" button on the customization screen.
- Select where to insert the group and click the "OK" button.

- Enter a display label for the added group. The display label can be left empty.
- If you want to initially display the group as collapsed, click the "Set" button for the added group and uncheck "Display group expanded".
- Click the "Sort/Group" button, then click the "Grouping" button for the group you want to configure.
- Select the columns and labels to include in the group and click the "OK" button.
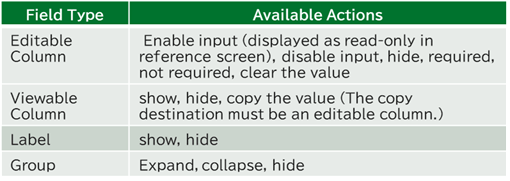
Changing Display of Columns, Labels, and Groups Based on Conditions
You can change column editability, visibility, required/optional status, value copying or clearing, free-form label visibility, and group expansion/collapse/visibility based on conditional logic using column data values. Multiple conditions and actions for when conditions are met can be specified. This enables you to create surveys where subsequent questions change based on answers to previous questions.
Click the "Conditional branch settings" button on the customization screen to display the conditional branch settings dialog.
- To add conditional logic, click the "Add conditional branch setting" button.
- Select the join type for conditions within the conditional branch.
- Specify "Column name", "Condition", and "Column value" as the condition.

- Specify "Target (Column name, Label name, Group name)" and "Action" as the action.