Correction of data that cannot be imported
This section describes how to correct data that cannot be imported as initial data in the loaded sheet.
If the following warning dialog box appears on the table setup screen, please review this page.
There are two ways to correctly import data from an Excel sheet into a table.
- How to correct problematic data in the 'Data Modification' screen
- How to change the data type of a target item to 'string' on the input item specification screen
Attention
If data that cannot be imported is not modified, it will be replaced with blanks and imported into the table.
Tip
A warning dialog box appears when there is a discrepancy between the data format set in the Specify Input Items screen and the data in the Excel sheet.
ex) Cases displayed when setting up a listing application

Correct problematic data in the 'Data Modification' screen.
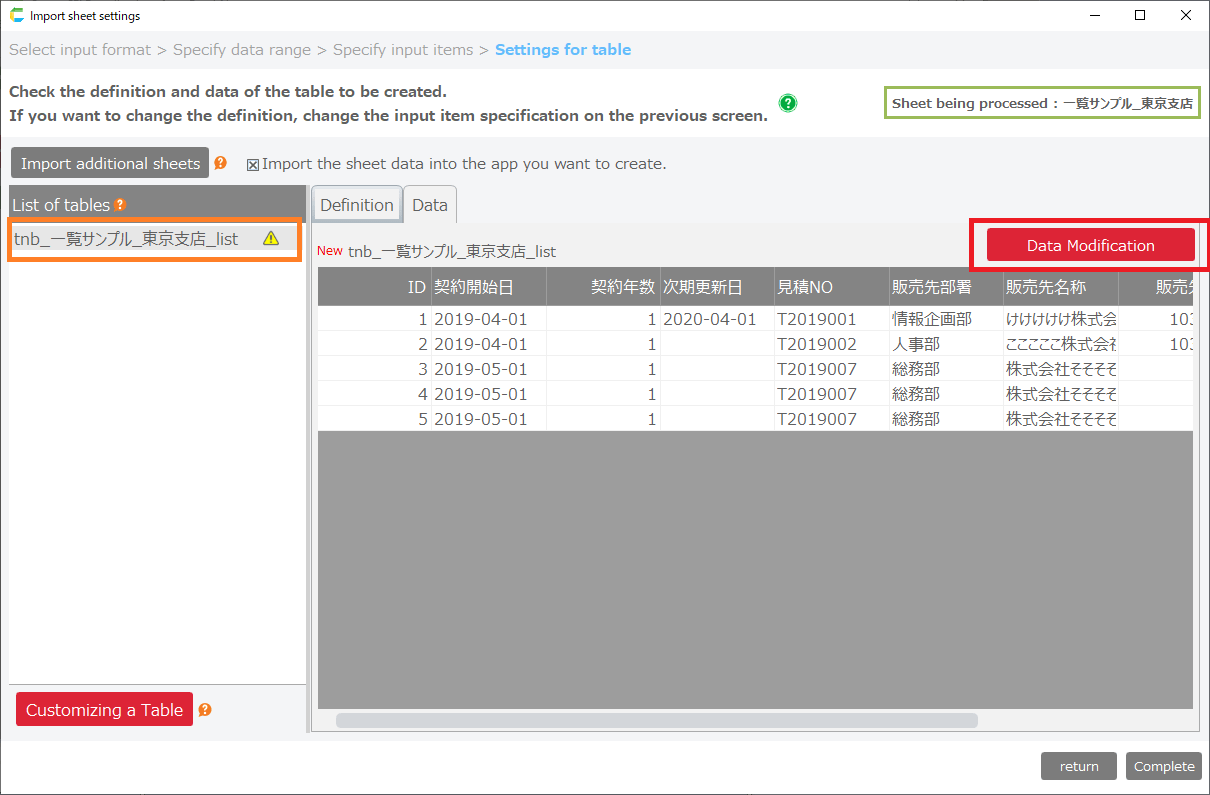
If the table to be created has data that cannot be imported as initial data, the 'Data Modification' button will appear.
Clicking the button opens the 'Data Modification' window, where you can correct the data.
- Correct data
When the screen is opened, a list of records with data that cannot be imported is displayed.
1) Number of records with problems … The number of records with data that cannot be retrieved.
2) Corrected data … Corrected data. The background is displayed in blue.
3) Problematic data … Data that cannot be imported. The cell background is displayed in yellow.
Tip
Selecting a cell allows you to edit the data.You can also hover over a cell to see why it cannot be imported and the target cell in the Excel sheet.
4) Batch Replace Column Data … This button is used to batch replace column data.
Tip
4) Batch Replace Column Data … This button is used to batch replace column data.For example, if there are multiple data such as '-' in an integer type item, use this function when you want to replace them all together with '0' or a blank field.
- Save the modified data.
Click the Save button.
Change the data format of the target item to 'string'.
If there is data in the imported sheet that cannot be imported as initial data, the 'Data Modification' button will appear.
Clicking on the button opens the 'Data Modification' screen, where you can check the items for which data cannot be imported.
- Check the items for which data cannot be imported.
- From the Table Setup screen, click the return button to return to the Input Item Specification screen.
- Change the data type of the input item identified in 1 to 'string'.
- Click the Next button.
- Select the Data tab of the Table Setup screen and verify that the data is displayed in the Table Data.
Attention
If the data format is changed to string, the output application will not have an additional input content format checker.If you wish to use the format checker, please consider using the 'Data Modification' screen to make the correction.